

How To Repair Mercury Classic 40 Hp Carburetor
How do you rebuild or overhaul a small engine carburetor?
Rebuilding the carburetor may be required if basic adjustments don't gear up your small engine problems or improve performance on your backyard mower or outdoor power equipment. Follow the steps below for overhauling small engine carburetors.
![]() Alarm: Always read the engine and equipment manual(south) before starting, operating, or servicing your engine or equipment to avert personal injury or property impairment. Fuel and its vapors are extremely flammable and explosive. Ever handle fuel with extreme care.
Alarm: Always read the engine and equipment manual(south) before starting, operating, or servicing your engine or equipment to avert personal injury or property impairment. Fuel and its vapors are extremely flammable and explosive. Ever handle fuel with extreme care.
Encounter an authorized dealer or contact Briggs & Stratton if y'all are unsure of any procedure or have additional questions. Discover all Engine Rubber Warnings
Footstep 1: Removing the Carburetor
Step ii: Disassembling A Bladder-Blazon Carburetor
Footstep 3: Inspecting the Carburetor
Step iv: Inspecting Air-Fuel Mixture Screws
Step 5: Reassembling the Small-scale Engine Carburetor
Footstep 6: Attaching The Carburetor & Air Cleaner Assembly

Step 1: Removing the Carburetor
- Disconnect the spark plug lead and secure information technology away from the spark plug. Then, remove the air cleaner assembly.

- Plow off the fuel valve at the base of the fuel tank. If your engine does not contain a fuel valve, utilize a fuel line clamp to forbid fuel from draining out of the tank while the carburetor is asunder from the engine.

- Some carburetors contain an electrical device at the base of the fuel basin to control afterfire. Disconnect the device, known as an anti-afterfire solenoid, by removing the wire connector from the solenoid's receptacle.

- With the carburetor still connected to the governor, unfasten the carburetor mounting bolts. If a connecting pipage joins the carburetor to the engine block, kickoff remove the pipe mounting bolts. Then, disconnect the carburetor from the pipe past removing the nuts and sliding the carburetor off the studs. Sketch the governor spring positions before disconnecting them to simplify reattachment.

- And then, disconnect the governor springs and remove the carburetor, taking special care non to bend or stretch links, springs or control levers.
Step 2: Disassembling A Float-Type Carburetor
Your carburetor contains a modest corporeality of fuel. Prepare a make clean bowl to catch dripping fuel and store small parts. During disassembly, inspect the bowl for clay and debris to determine the condition of your carburetor.
- Remove the fuel bowl from the carburetor body. The fuel bowl may be attached with either a commodities or the high-speed mixture spiral.

- Push the hinge pin out of the carburetor body with a pocket-sized pin or pin punch. Take intendance to tap only the pivot to avoid dissentious the carburetor body.

- Remove the bladder assembly, inlet needle valve and fuel bowl gasket.

- If your carburetor contains an idle mixture screw, remove it forth with the jump.

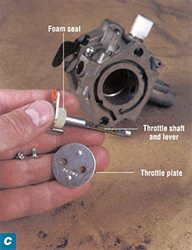
- Rotate the throttle plate to the closed position, remove the throttle plate screws and the throttle plate.
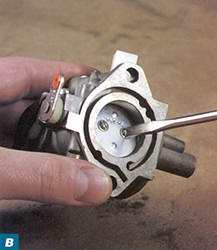
- Remove the throttle plate shaft and foam seal.
- Then, remove the choke plate and asphyxiate shaft and felt or foam washer in the same way.
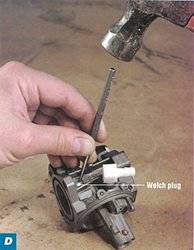
- Use your carburetor repair kit to identify replaceable welch plugs. These seals cover openings in the carburetor left over from machining. Insert a sharpened 5/32" pin dial at the edge of each plug to be removed and tap cleanly to free the plug.
- Unscrew the main jet from the side of the carburetor pedestal (if equipped). And so, unscrew the emulsion tube; it may be screwed in tight. A carburetor screwdriver is the best tool for the job. Information technology's designed to fit the slot in the head or the emulsion tube and so that you won't damage the threads inside the pedestal of the tube itself equally you loosen information technology.

- Remove the emulsion tube.

Stride 3: Inspecting the Carburetor
- Soak metal and plastic carburetor parts in all-purpose parts cleaner for no more than 15 minutes to remove grit. Or, while wearing safety spectacles, spray the parts with carburetor cleaner. And then, wipe abroad solvent and other residue thoroughly using a clean cloth. Never use wire or tools considering they tin harm or further obstruct plugged openings.

- Inspect all components and apply additional carburetor cleaner to loosen stubborn grit and to clear obstructions.
- Supplant whatever parts that are damaged or permanently clogged.
Pace 4: Inspecting Air-Fuel Mixture Screws
- Brass mixture screws control the air-fuel mixture at high speed and at idle. Over tightening can damage the tip of the spiral and then that proper adjustment is no longer possible.

- Remove whatever non-metal parts and soak mixture screws in carburetor cleaner for 15 minutes.
- And then, inspect them carefully for wear. Supercede a mixture screw if the tip is bent or contains a ridge.
Step five: Reassembling the Small-scale Engine Carburetor
- Install new welch plugs from your repair kit using a pin punch slightly smaller than the outside bore of the plug. Tap on the punch with a hammer until the plug is apartment (stiff blows with the hammer will crusade the plug to cavern in). And then, seal the outside edge of the plug with enamel nail polish.

- Assemble the asphyxiate by inserting the return spring within the cream seal and sliding the spring and seal associates onto the choke shaft. Plastic choke plates have a finish catch at one stop of the spring; metal plates take a notch to hold the hook at one end of the jump.
- Insert the choke shaft into the carburetor body and engage the return spring. If the choke lever uses a detent leap to command the asphyxiate plate position, guide the spring into the notched slot on the choke lever. Place the choke plate on the shaft with the unmarried notch on the border toward the fuel inlet. Lift the choke shaft and lever up slightly and turn counterclockwise until the stop on the lever clears the spring anchor. Button the shaft downward.
- Insert the asphyxiate plate into the choke shaft or attach it with screws so that the dimples face the fuel inlet side of the carburetor. The dimples help hold and align the choke shaft and plate.
- Install the throttle shaft seal with the sealing lip down in the carburetor trunk until the height of the seal is affluent with the top of the carburetor. Plough the shaft until the flat side is facing out. Adhere the throttle plate to the shaft with the screws and then that the numbers on the throttle plate confront the idle mixture screw and the dimples face in.
- Install the inlet needle seat with the groove down, using a bushing commuter. Then, install the inlet needle on the float and install the assembly in the carburetor torso.
- Insert the hinge pin and center pin. And so, install the safety gasket on the carburetor and attach the fuel bowl, fiber washer and bowl nut.
Step six: Attaching The Carburetor & Air Cleaner Assembly
- Position the carburetor and then the beveled border fits into the fuel intake pipe and attach the carburetor with basics or bolts, as required, leaving these fasteners loose for final tightening with a torque wrench. Consult your Briggs & Stratton Authorized Dealer for proper tightening torque.

- Install the air cleaner assembly, making certain that the tabs on the bottom of the air cleaner are engaged.
More than Carburetor Repair Resources
How to Make clean a Small Engine Carburetor

Source: https://www.briggsandstratton.com/eu/en_gb/support/faqs/browse/carburetor-rebuild.html
Posted by: hatchactim1991.blogspot.com
0 Response to "How To Repair Mercury Classic 40 Hp Carburetor"
Post a Comment